Tuesday, January 31, 2012

WOYWW 139

Working on a few projects for the Cooking with Cricut design team.  Check out the blog hop on 2/11 and 2/12 to see what I made :)   They are having a DT call also, check them out and tell Melin I sent ya!  They are a fun, loving group, who really knows how to work together.

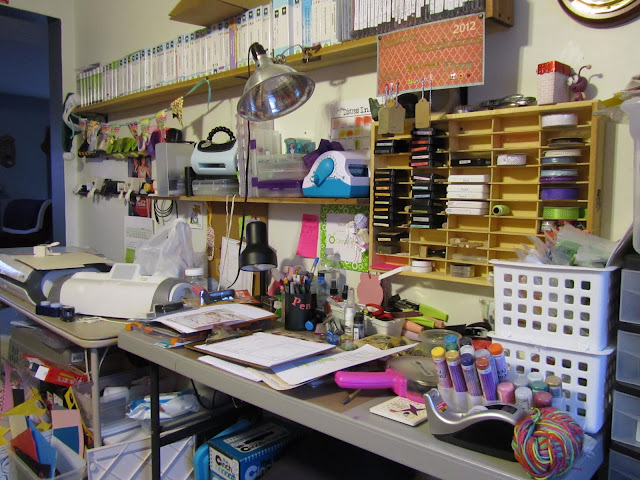
Here is the ol' craft desk today.  Quite a mess.  This week I added one more Distress ink, and got a couple of Piggy Tales warehouse clearance kits.  They have some pretty neat stuff, with these little windows and hinges and barn door type things in them.  Will be interesting to try out.  I ordered two kits, but by counting the paper in the box I received, I think they may have just sent me one kit, so am contacting them to see what the scoop is.


And for those who saw last week, here is an update on Katie's little work space as well.  She is just about finished with her valentine's cards for school.

Here is a finished girl one!  We put the bottle caps on with repositionable glue dots so the kids can take them off and wear them as necklaces.


I found this reading Ohhh Snap's blog who then led me to find Julia's Stamping Ground where the chaos begins!


p.s. (snagged from http://jozartdesigns.blogspot.com/ but I had to share it too!)

Congratulations to, our lovely, famous Julia, founder and instigator of What's On Your Workdesk Wednesday over at the Stamping Ground. Julia created this weekly Wednesday blog hop around the world's crafty desks, otherwise known as the Big Global Snoop, and she has been featured in this month's Craft Stamper magazine. I agree with, and quote from the article that her blog "is generally a mixed bag of craft loveliness, craft irreverence and day to day opinion" 
Rock on Julia, we love you!

Friday, January 27, 2012

My first shaker card


It's a shaker card!  Yea that is glitter there in the butterfly.  My boyfriend really likes butterflies so I made this valentine with that in mind.  It has some static in the glitter it looks like, so there is a little sticking but I think you can see the bulk of the glitter at the bottom :)
I got this idea from PaperTrey's Blog and really wanted to make it.  I don't yet have any PaperTrey supplies so I could not enter this there.  I wanted to make something with my Cricut, and for this project I learned that you cannot cut craft foam without a deep cut blade.  I also tried this the first time with zip dry glue, nope you really do need to use the sticker maker as they show in the blog.  Wow, the second one I made was so much better!  That is the one that I used.

This is entered in:
http://www.creativetimeforme.com/2012/01/throwback-thursday-challenge.html
http://fantabulouscricut.blogspot.com/search/label/Challenge%20Me%20Monday
http://reasonableribbon.blogspot.com/2012/01/rrr-challenge-40-valentines-day-theme.html


Supplies
The Paper Co, Kraft Cardstock
Bazzill, Sugar Cream Cardstock
K&Co, Suzy Ultman Lion Sleeps Pink Heart Circles paper
BasicGrey Urban Prairie Weather Vane Cardstock
craft foam
acetate (repurposed from a set of stamps)
atyouSpica, Sand
atyouSpica, Blossom
Really Reasonable Ribbon
Glue Dots
My Creative Time Stamps, This & That
glitter from Walmart
Xyron Sticker Maker
Tim Holtz Distress ink, Broken China
May Arts Jute Burlap, black and natural
Cricut Cartridge, Paper Trimmings

Wednesday, January 25, 2012

WOYWW 138


Started a new project today, you can see the beginnings on my desk, got my clipboard and some stuff printed out with the rules.  Hmm....someone left a ball of yarn on the corner of my desk.  This week I was in the sewing room looking for something else and found one of those sets of baggies with two large rings to put embroidery floss in, these are decent size bags.  So, I organized all my ribbons that are not on spools into it.  It is there on the top of the white bin on the right.  I got several things this week: added 2 more glitter pens, 4 more distress inks,  another punch and stamp, and best of all....an ATG GUN!!  I also got the small xyron sticker maker this week, can you find it?   I received my shipment of more empty cases to put my acrylic stamps in.  They are larger than CD cases, called Calendar cases, very nice.

Here is a photo of Katie's temporary work area next to mine.  She is 9 and is working on her valentine's for school.  They are in progress.  In the box you cant really see she has made bottle cap necklaces she will be attaching to the center.  Once she gets them all done, I will post what they look like.

I found this reading Ohhh Snap's blog who then led me to find Julia's Stamping Ground where the chaos begins!

Cooking with Cricut Challenge #70


THEME-CHALLENGE:  Anything but a card must add Polka-Dots and the color yellow.   This challenge can be found at http://www.cookingwithcricut.com/


I decided to make a book mark for this challenge.  The sentiment looks like it didn't stamp well but actually its a Tim Holtz stamp, which tends to stamp with that distress look he is known for.  It looks better in person :)


Supplies
Walk in my Garden Cricut Cartridge
Floral paper is from scrap bin
DCWV adhesive mat stack, neutrals
Bazzill Basics Classic Yellowgreen
Ranger ink, scattered straw
Versamark ink
yellow embossing powder
RRR ribbon, in yellow with polka dots!
Archival Ink, sepia
Tim Holtz Flights of Fancy stamp
Peachy Keen medium polka dot print stamp
Gelly roll clear star pen
Zig 2 way glue

Sunday, January 22, 2012

Peachy Challenge 01 Pockets


Supplies
Bazzill Cardstock; Walnut Cream, Ivy
Jillibean Watermelon Gazpacho Soup
The Paper Company Kraft Cardstock
PK293 Peachy Keen Cornies stamp
PK264 Peachy Keen Easter Egg Words and Bunnies stamp
Stazon Jet Black
Tim Holtz Distress inks; Spun Sugar, Dusty Concord, Broken China, Tea Dye, Scattered Straw
atyouSpica glitter pens; sky blue, lilac, sand
cotton lace from Archiver's
i-rock white gems
Zots
ATG gun
scrap twine pieces
white gelly roll
clear stickles

I border punched the edge and folded it over, but you dont really see the detail in the full photo so here is a close up.

 And here is a close up of the flowers.  Each started as white lace and was dyed with the distress ink.


From http://www.peachykeenstampschallenge.blogspot.com/

Thursday, January 19, 2012

Peachy Challenge 01 :: Pockets

Peachies!! Welcome to the FIRST of our
BRAND NEW PCHALLENGES!

Thank you all for linking up with us last week, we're THRILLED to announce our winners, but first, let's take a peek at our NEWEST Challenge including inspiration from our talented design team members!

THIS WEEK'S CHALLENGE
Today's challenge comes from the SUPER creative RAVEN:
Create a project with a pocket! 
Whether it folds, tucks, or hides a treat,
pockets are a fun way to add something extra!

We'll be awarding "TOP PEACH" to the player who uses their Peachy Keen Stamps this week and our two runner ups will
receive a spiffy badge to display on their blog!
Remember: you don't have to use our Stamps to link up, but you do have to use our stamps in order to win the prize. We will continue to have random giveaways during our release weeks and on our PK Inspiration Blog!

Challenge Guidelines:
  • Design must be new, created specifically for this challenge
  • Project must meet Challenge outline
  • Link up by 1/25 - 11:59 pm CDT

Saturday, January 21, 2012

Cricut Circle Weekly Challenge #50

This is such a simple neat dimensional technique.  Scraplifted from blog.basicgrey.com/?p=1630


Art Nouveau Cartridge Tulip 2 design cut at 5 inches with shift, shift layer 1 and  layer 2 cut 3 times
Bazzill Cardstock in Walnut Cream, Ivy, and Classic YellowGreen
The Paper Company Natural Cartstock (Kraft)
My  Minds Eye So Sophie "Open your heart" Berry Stem two sided card stock
Ranger Distress ink in Tea Dye, Tattered Rose and Wild Honey
atyouSpica Black marker
Cuttlebug Script Texture embossing folder
PK238 Pocket Posies stamp set for the sentiment
October Afternoon Sidewalk twine
Archival Ink in Sepia
ATG gun (new, oh yea! see previous blog post)
Xyron Sticker Maker
Zig 2 way glue
Crop-a-dile Corner Chomper, stub/deco
hole punch

I cut the kraft card stock at 4.25 x 11 and folded for a top fold card of 4.25 x 5.5.  Then I cut the cream cardstock at 4 x 5.25, embossed it and adhered it.  I used my Xyron Sticker maker to adhere the two layers of green.  I then folded each of the top petals of the flower in half and layered them with a very thin line of zig glue in the center and let dry.  Then I could fold up the top two layers, creating the dimensional effect.  I edged the petals with distress ink, one with rose and one with honey.  I stamped the sentiment on a scrap of the kraft and then trimmed it, eyeballing the final size leaving a nice edge all the way around.  Then I punched the edges with the corner chomper and distressed them with the tea dye.  I punched two holes in the bottom and tied a bow with string.  I adhered it with the ATG.

Tim Holtz Distress Ink Collection.

My collection is growing.  Got 4 new ones last night.  I really like using this sheet provided by Tim Holtz.  I wish they had another one for the seasonal ones, but I just put those around the edge.  I wish I would not have missed the one from this past fall, but will just have to keep an eye out for when spring is out and get those.  I am hoping for more purple.

I have organized all my inks and printed out labels for each for the front and then rubbed some of the ink on the label, to give a color, which really makes it easy to use.  I then stuck velcro on the bottom to stick my little ink blending foams to.  Works out great!~


I Finally Got ONE!!!

Oh yea, happy dance, you know you want one, gotta have it, need to use it, whoo hoo!!

That is all.

Wednesday, January 18, 2012

WOYWW 137, my first


This week's focus has been on working on my submission for the Above Rubies Design Team so you cannot see any of my finished projects, but you sure can see my mess!  I got a new set of Martha Stewart Punches that I now have to figure out how to redo my wall, there is no more room for any more punches!  I do have another curtain rod, but oh where to put it?  I also went to a mini valentine class and have the items from that on my desk as well.

This craft half of the room (the other half is my work office!) has been in constant flux the past 6 months as I add more and more stuff, move things around to find a better working posture, and try to make my crafting area more usable to me.  I really like having this area downstairs. (I have an entire bedroom upstairs called the Sewing Room that has the sewing machines, basket making stuff, spinning wheel and related stuff in it, oh nuy the loom is actually downstairs here in my office lol)

My craft space consists of two desks, here is from the right side.  I pulled the chair back out of the way
 Here is from the left side.

I have two boxes of scrap I need to go through.  

I found this reading Ohhh Snap's blog who then led me to find Julia's Stamping Ground where the chaos begins!

Friday, January 13, 2012

Ink organization

This is for the task to declutter my craft area of my Crafting New Years Resolutions.  This is just a start.

I wanted to do something to rearrange my inks, that are always stacked up and then I cannot find the blending foam that goes with each very easily.

I have seen folks before use velcro and stick each foam to the bottom of the ink. I found a scrap of velcro and cut small pieces of the rough side and stuck them to the bottom of each of my Tim Holtz Distress inks.  Then I stuck a blending foam pad to each.

I saw on another blog someone used an old wooden cassette tape tray to organize their inks, one per slot that a cassette would go in.  Looking on ebay, there were several but they were pricey and I was worried about them getting damaged in transit or what if the ink pads didn't fit.  When I measured a Distress Ink pad, it was exactly the same height as a standard cassette case.  A good friend of mine works at an estate seller, so I asked her and long story short, they didnt have any where she worked, but they personally had a couple they wanted to get rid of!  Win!  They had two, a larger 50 slot and the regular single cassette 100 slot.  I am starting with the 50 slot, as I can fit 2 inks per slot, with foam and found I had a lot of space left.  So I added spools of ribbon and other handy tools I use all the time so it's all in easy reach!

Hmmm, I need more inks!


Cricut Circle Weekly Challenge #49: Function Meets Fun Challenge!


This one took me twice as long to conceive as it did to make it.  I do not do a lot of home type projects, my main focus is cards and such.  This one was SUPER simple with Cricut Craft Room and my CTMH Art Philosophy Cart!  I used my Xyron sticker maker and it went together in seconds!  Paper is acutally glitter paper for the solid, you cant tell in the photo as much, from the DCWV Glitter Stack and the stripe is from Echo Park Summer Days sheet.  


The Challenge: As your taking down the decorations from the holidays, there seems to be a feeling to give everything in our homes a fresh start to the new year. We feel a desire to reorganize those closets, and clean out things that could use a little less clutter. This week’s challenge is all about “function meets fun”! Show us how you use your Cricut machines to organize your home, office, garage, etc.
Rules and Guidelines: Circle Blog Challenges are open to Cricut Circle Members only. Your project must be newly created for this challenge and include atleast 2 Cricut Image Cuts. You must submit a project to be entered into the Challenge Prize Drawing. One entry per person, please.

Tuesday, January 10, 2012

Day 314 at 365 cards

For this challenge we had to follow a sketch.  It looked so simple, until I tried to do it.  I had a hard time deciding what really went together, and then getting the proportions right.  I was definitely too literal on this one, trying to get things to line up.  I almost didn't blog this one, it still feels like its missing something.    The blue square doesn't look straight in the photo but it measures straight on the card.  I like the little rose die cut I had in my stash and used that as my focal point and inspiration for color choices.  Maybe I should have used a light green instead of the yellow square?  I was pulling the yellow from the striped square.  


Supplies
The Paper Co Pale Rose cardstock
October Afternoon Canning Jar cardstock
October Afternoon Flower Sack Die cut
yellow and turquoise scrap
October Afternoon Sidewalks wrap pack for the twine
Sepia Archival Ink
Stamps from a Club Ruby kit
I-roc white dots

Sunday, January 8, 2012

PK Let's Face it Friday


It has been a very long time since I did any scrapbooking.  I found a bunch of photos from when my daughter was really small and decided I wanted to do a scrapbook of my kids when they were little.  This here is a collection of various face photos of her that I really liked.  I took these photos with me when I went to a scrap mania event at my local Archiver's store.  I brought my PK faces of course, the cornies are so much fun, and this is what I came up with!


-----------------------------
**COLOR COMBO**

Create a project using your PKS Faces and the color combo provided.
Any projects not using a Peachy Keen Face will be disqualified from winning the prize, sorry! :(
-----------------------------
THE RULES:
  • Project must be new
  • Must incorporate Peachy Keen Faces
  • Please link directly to your blog post (not blog address, please)
Link by 01/12 - 11:59 pm CDT 

Wednesday, January 4, 2012

Cooking with Cricut Challenge #67 Something New


For this challenge I needed to use something new. The only crafty thing I got new was some ink blending foam pads (which I did use on this) but Katie got the Give a Hoot cartridge for Christmas so I borrowed that from her.

This card I made using a different type of fold.  To create this card, and so it will fit in the A2 envelope, cut your card base at 11x4.25 and then score it at the 2.75 and the 8.25 marks and it will fold nicely and meet in the middle.

Supplies
Kraft card stock (and envelope)
October afternoon 5&dime striped paper
Bazzill Basics Classic Yellow Green
My Minds Eye So Sophie  Your heart card stock
few scraps from my scrap bin
Ranger Distress inks in tea dye, wild honey, dusty concord and forest moss
Zig 2 way glue
Gelly Roll Clear Star
Birthday stamp from Hero Arts
Cuttlebug bubbles embossing folder